Some photographs of the Ezra Cup Polo competition held in Calcutta in December 2011. For more Polo photographs please do visit my web site www.sujoydas.com
Tuesday, December 27, 2011
Thursday, December 22, 2011
Himalayan Homestays: Spiti Lhalung Village
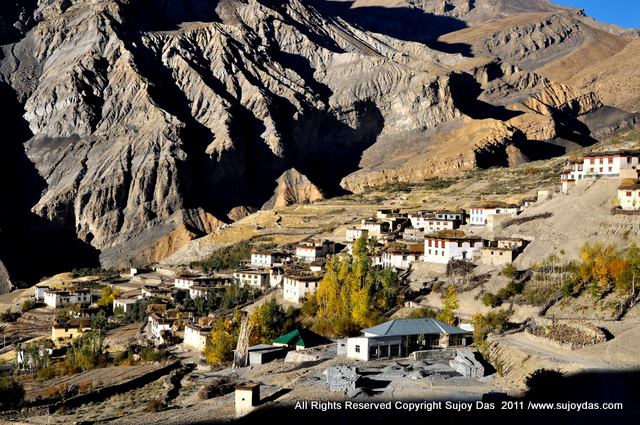
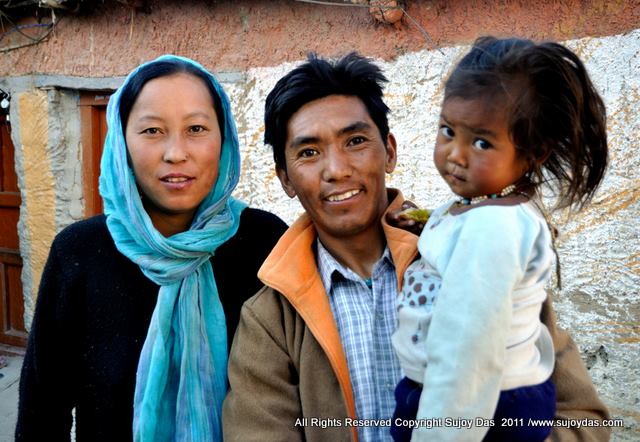
The village of Lhalung (3800 metres) is now connected to the district headquarters of Spiti, Kaza, by a motorable road but is also possible to walk to Lhalung from Komic and Demul. We stayed at Khabrick Homestay in Lhalung run by Tashi Khabrik and his charming wife Dolma. Tashi is extremely knowledgeable about the region and also works as a trekking guide in summer for treks across Parang La to Tso Moriri and other areas in Spiti. He can be contacted at tashi.bodh@yahoo.co.in and +91 9418962704. Lhalung has a splendid monastery on top of the hill and for tourists visiting Dhangkar, a visit to Lhalung just an hours drive away is strongly recommended. Alternatively, the Spiti left bank trek starting from Lhangza passes through Komic, Demul, Lhalung and then onto Dhangkar.
 |
| The village of Lhalung |
 |
| The Serkong monastery above Lhalung village - a hidden gem! |
 |
| Tashi, Dolma and their little girl outside Khabrick Homestay |
Thursday, December 15, 2011
Spiti Homestays: Komic Village
On a recent trek in Spiti in October 2011, I had the pleasure to stay in some very pleasant home stays. One of them was called Kunga Homestay in Komic village at an altitude of 4500 metres. Kunga Chorden, a young lad of 23 years who runs the home stay with his wife provides very comfortable accommodation with good food. Kunga later accompanied us on our three day trek from Komic to Dhangkar. His phone nos are 01906 200050 and +91 9459981295. He can be also contacted through Mr Ramesh Lotay of Spiti Holiday Adventures in Kaza at +91 9418439247/ +91 1906 222711. Ramesh Lotay is also on e mail loteykaza@yahoo.co.in
 |
| The village of Komic |
 |
| Our room at Kunga Homestay |
 |
| Kunga Chorden who runs the Kunga Homestay and also guides treks in the region |
Wednesday, December 7, 2011
Photography Tips and Tricks
After my two posts
on tips and tricks for mountain photography in this blog, I am giving below
some general tips for everyday photography which I am sure would be
useful.
Tip 1: Add
people to a landscape
Add a subject to
the foreground of a landscape shot to give depth to the photograph. An example of this is given below
Tip 2: Use
fill flash in daylight
When shooting people, in strong noon day sun use the pop up flash or even a speedlight to fill dark shadows especially under the eyes and bring out details. This ensures that the background is also exposed correctly and not washed out. An example of this is given below:
Tip 3: Kick
the “I’ll fix it in Photoshop habit”!
You need to ensure
that the photograph is taken in the camera not fixed in Photoshop – so white
balance, exposure, lighting, focus etc all need to be bang-on! If you are not
sure of the exposure bracket! Check the histogram on the LCD display to ensure
that exposure is correct.
Tip 4:
F8 and be there
Basically this famous
photography axiom asks you to be ready to shoot. So rather than adjust white
balance, aperture, shutter speed ,
metering modes, focus modes etc before
taking a photo, you to need to set all this before hand. On a normal sunny day,
I will usually set the following before I start out: WB auto, ISO auto set to
maximum of 800, aperture priority around f8 or so, and matrix metering, AF-S
for single focus. This allows me to shoot in most situations provide the light
is reasonable. And, if I have time I would
bracket three to four exposure either by using auto bracketing or manually -0.3, -0.7, -0.1, +0.3, + 0.7. This
usually nails the photograph right in the camera.
Tip 5: To
reduce noise at high ISO make sure your exposure is bang on target!
Modern day cameras allow you to shoot at very high ISO’s like 1600, 3200 and even 6400 on top end models. However, the major drawback at high ISO is noise. So, one way of reducing or minimizing noise is to make sure your exposure in spot on. If you have underexposed even a little bit there will be ample noise in the shadow areas which is always difficult to get rid off. So try to ensure a correct exposure by shooting, maybe, a number of photos at different settings so that at least one is correctly exposed. This is an example of a photo shot an ISO 1600 but due to correct exposure there is hardly any noise:
Tip 6: On a tripod turn VR or IS off
This is a mistake
which I have made a number of times. If you have a camera on a tripod you don’t
need to switch on VR or IS as the camera is likely to be rock steady and does
not need any vibration reduction. Often
in a hurry we forget this and shoot with VR or IS on.
Tip 7: For
critical photos use RAW
When you need to
use photographs for magazine stories, prints, exhibitions etc raw is the way to
go. You can convert raw files using the correct version of Camera Raw with Photoshop
and with proprietary converters like Capture NX2, View NX for Nikon.
Ideally most
photographers would recommend a full heavy weight tripod but is difficult to
carry around and also in some situations difficult to set up. So I have a small
Slik table top which can also fit into a jacket pocket which I use when I need
support. The Joby Gorilla pod is also an option and has the advantage of
flexible legs!
Tip 9: Don’t
put the camera away at dusk or at night
On the subject of
tripods if you have one with you then photography at night and at dusk becomes
a distinct possibility. Long exposures makes the world look a lot different and
details in the dark night sky can often produce stunning effects.
Tip 10:
Less is often more!
The proliferation
of social media and the free photo web sites have made it possible for everyone
to post their photos on the net even if they don’t have their own web sites or
blogs. However, in their enthusiasm to post photographs of a holiday or journey
I often find a facebook album of a hundred photos or more. Similarly, picasa
web albums sent to me to review have similar number of photos. Usually with so
many images the impact is lost and the good images get masked by the mediocre
ones. So it often helps to edit tightly, remove duplicates and similars, weed
out all photos that are not in focus, overexposed or underexposed, badly
composed and leave the best ones for the viewers! Most of my albums rarely have
more than twenty photographs and the majority have between ten and twelve!
Happy shooting!
Thursday, December 1, 2011
Angkor Wat Photos
These are some photographs from Angkor Wat Cambodia. To view the rest of the album please do visit my web site www.sujoydas.com
Labels:
Angkor Wat,
cambodia
Wednesday, November 23, 2011
Value for money lenses for Nikon FX format: D700, D3 etc.
35 F2 AF-D USD 250-350 Used
This lens dates from the film days and provides a fast maximum aperture of F/2 and is a compact sized wide angle. Some photographers prefer to use this as their normal lens. At a very affordable price this may well be a part of every FX shooters bag. For a review of this lens please visit http://photozone.de/Reviews/214-nikkor-af-35mm-f2-d-review--test-report
28-105 AF-D 3.5/4.5 USD 150-205 Used
This was a very fine normal lens in the film days and I used it extensively on my F3, N90 and FM cameras. Nowadays available at a real bargain price it is capable of giving excellent results on an FX body. Covering five important focal lengths, 28mm, 35mm, 50mm, 85mm and 105 mm, it can be the ideal walk around lens! For a review please visit http://www.fredmiranda.com/reviews/showproduct.php?product=110
70-300 F4.5/5.6 AFS VR USD 350-400 Used and USD 550 New
This is a telephoto zoom that works well both on FX and DX bodies. Though overshadowed by it's bigger brother the 70-200 f2.8 VR, the lens has fine optical quality and performance and is much smaller and lighter - a good travel lens. Though a number of reviewers have called the lens soft between 250 and 300 mm, my personal experience has been that the lens stopped down to around f 6.3-8 delivers crisp images at 300mm provided you can hold the camera steady! (read monopod or tripod). A sample of a photo shot with this lens is here 70-300 VR photo.
85 f1.8 AFD USD 350-450 Used
This is a real value for money short telephoto lens very suitable for portraits or low light shooting. With a maximum aperture of f1.8 and the low noise of a D700 you can well imagine the possibilities! This was my favourite portrait lens in the film days and I still use on my digital bodies. This is a highly recommended lens and warrants a place in every FX shooters bag! A shot taken on this lens is here 85 F1.8 photo . For a review please visit http://www.photozone.de/Reviews/221-nikkor-af-85mm-f18-d-review--test-report
20-35 f2.8 AFD USD 600-700 Used
This was the standard wide angle high speed zoom in the film days and it still holds its own on digital bodies. It covers four important focal lengths i.e. 20mm, 24mm, 28 mm and 35mm and with a fast 2.8 aperture can relly deliver stunning results in low light conditions. For a review please do visit http://bythom.com/2035lens.htm and a sample of this lens shot at 20 mm on film and scanned is here 20 mm photo
Tuesday, November 15, 2011
Zanskar Photos
This is a small collection of my photographs from Zanskar. For more photos please visit http://www.sujoydas.com/Ladakh-and-Zanskar
Friday, November 11, 2011
Ghorepani Poon Hill Trekking
Annapurna foothills provide tremendous trekking with delightful trails connecting villages and ridge tops. This picturesque trek winds through enchanting villages with ochre thatched houses, terraced rice fields and rhododendron forests, which are spectacular in the spring when whole hillsides are cloaked in colourful flowers. The ridge top village of Ghandrung provides one of the finest viewpoints of the Annapurna Mountains with magnificent views of the four Annapurnas, and Machapuchare with its fishtail summit. It is a good walk to the top of Poon Hill 3150 metres with a dress circle view over the four Annapurnas and Dhaulagiri as well.
Day 01 Kathmandu to Pokhara (885 metres) – 6-7 hours by bus 4th Dec 2011
Drive to Pokhara by the comfortable Green line Tours Tourist Bus and check into the Gurkha Haven Guest House in Damside which is a quiet area of Pokhara. Spend the evening in Pokhara taking in the sights near the lake and relaxing prior to the start of the trek.
Day 02 Trek to Ghandrung (1950 metres) 5-6 hours walking 5th Dec 2011
Leave Pokhara around 7.30 am after a good breakfast at the German Bakery and travel in our own micro bus to Birethanti the start of the trek. From here we begin our trek with a walk along the river to the scenic village of Syuli Bazar. We have an early lunch at Syuli Bazar and then commence the three hour climb to Ghandrung. Overnight at a lodge in Ghandrung. Ghandrung is largely a Gurung town and is the headquarters of the Annapurna Conservation Area Project (ACAP). Many of the lodges here have the more environmentally friendly features that ACAP encourages such as back boilers, solar panels, etc.
Day 03 Trek to Tadapani (2595 metres) 4 hours walking 6th Dec 2011
From Ghandrung the trail climbs gently to the village of Baisi Kharka where we stop for a cup of tea and then make the final ascent to Tadapani. Overnight at a lodge in Tadapani. The views of the Annapurna Mountains and Machapuchare from here are stunningly close.
Day 04 Trek to Ghorepani (2750 metres) 6-7 hours walking 7th Dec 2011
The trek from Tadapani to Ghorepani involves a number of ups and downs! We pass through the villages of Banthanti and Deorali before reaching Ghorepani. Overnight at a lodge at Ghorepani.
Day 05 Ghorepani to Tirekedhunga (1515m) -5 hours walking 8th Dec 2011
We visit Poon Hill at sunrise to watch the views over Annapurna and Dhaulagiri. After breakfast we begin our walk down to Ulleri (1960m) We stop for lunch at Ulleri and then start descending the 3000 steps to Tirkedhunga ( take it easy!). Night at Tirkedhunga.
Day 06 – Tirekedhunga to Birethanti to Pokhara (885 metres) 4 hours walking 9th Dec 2011
The trail descends from Tirkedhunga to the village of Birethanti. We have our lunch at Birethanti and then walk for half an hour to Nayapul. We cross the Modi Khola on a suspension bridge then follow the river valley to the road-head at Nayapul. Here our trek ends and our private vehicle takes us the short way to Pokhara. Here we check-in at the Gurkha Haven Guest House again From the hotel roof, across the lake and above the terraced hillsides, we may catch a glimpse of the sun setting on Annapurna and Machapuchare once again.
Day 07 Pokhara to Kathmandu (885 metres) 10th Dec 2011
We take theflight back to Kathmandu and enjoy the view of the mountains. Those who wish to stay on in Pokhara for a day or so rest and shopping are welcome to do so and arrangements can be made accordingly. Pokhara is a great place to chill out for a few days after the trek! It has good food and relaxing boat rides on the Phewa Tal lake and of course shopping!
Trek Costs
•For Nationals of SAARC countries – Rs 26,600/-
•For foreign nationals- USD 750/-
•The cost is per person for Kathmandu to Kathmandu (8days) as per the itinerary
•Costs given above are at current rates and may change without notice. Changes if any will be notified 2 months before the trek.
•Group size will be limited to eight/ten only.
Costs include:
• Luxury Tourist bus from Kathmandu to Pokhara and flight back to Kathmandu.
•Taxi fare from hotel in Katmandu to bus station and back. Taxi fare in Pokhara from bus station to guest house and back.
•ACAP national park permit and TIMS permit for trekking in the Annapurna region
•Travel from Pokhara to start of trek and back by micro bus.
•Two nights guest house stay in Pokhara (accommodation only – Hotel Gurkha Haven and one night hotel stay in Kathmandu ( Hotel Nirvana Garden )
•All accommodation on the trek on twin sharing basis
•Cost of porters/guides for the trek. Please note that porters will carry one duffel bag or backpack not exceeding 20 pounds in weight for each trekker comprising of personal items, clothing, sleeping bag etc.
Costs not included:
•Meals in Kathmandu and Pokhara
•Airport taxes at Kathmandu and Pokhara airports in case of flights.
•Breakfast lunch and dinner on the trek is not included
•Desserts, drinks, and exotic items listed in the lodge menus are not included. Alcohol, cold drinks (coca cola, sprite, beer), juices, ice cream etc on the trek and in Pokhara.
•Client travel and medical insurance of any kind.
•Emergency evacuation costs if needed.
•Video camera fees in National Parks (where applicable).
•Bottled drinks; boiled, filtered or bottled water; alcohol; snacks etc
•Hot showers (Rs 200-300 per shower);
•Personal clothing and equipment; sleeping bag; douvet /down/ goretek jacket, medicines for personal use etc.
•Air fare from residence country to Nepal and back
•Tips to porters and guides at the end of the trek
Food Costs
•You should budget USD 20-25 per day for the food on the trek for five days and USD 15-20 per day for food in Kathmandu and Pokhara. So for eight days this comes to USD 185 say USD 200.
For testimonials from past South Col trekkers please visit
For photographs of the region please do visit
Wednesday, November 9, 2011
Ladakh Photos
This is a small collection of my photographs from Ladakh. For more photos please do visit my web site http://www.sujoydas.com/Ladakh-and-Zanskar
Friday, November 4, 2011
Photography Workshop Kolkata
ILEAD
ESSENTIALS OF PHOTOGRAPHY WORKSHOP
WITH SUJOY
DAS
November 20th 2011 Sunday
TIMINGS
This is a one day
intensive crash course photo workshop which will begin at 10.30 am and end at 6
pm.
LOCATION
iLEAD: Institute of Leadership ,
Entrepreneurship & Development
113/c/1,Matheshwartala Road
Kolkata (Calcutta ), India
113/c/1,
Kolkata (
The location map of
ILEAD is given in this link
REGISTRATION FEES
The registration
fees are Rs 1500/- payable in advance. Please do contact ILEAD ph nos 40182000/ 98300 15201/ 98300 15202 or e mail
sujoyrdas@gmail.com to complete the registration process.
WHO SHOULD ATTEND
Amateur Photographers interested in taking photography seriously. No Age limit/ No Qualifications / No Pre-requisite except an interest in photography and a desire to shoot better photographs every time! If you have a camera please bring it with you!
SCOPE OF THE WORKSHOP
Equipment & Lenses
• Know what to buy and what not to buy and learn how to use your gear effectively.
• Learn from choosing the right body with right features to connect to the right set of lenses.
• Also tips about photography accessories like tripod, SD/CF cards, flash, filters, bags, etc., will be discussed.
• Understand the tools of trade for Close-up, portrait and Landscape photography.
• This session will also teach you how to manage and take care of your camera gear.
Master Exposure
• Learn how to make a great exposure and forget all the guesswork.
• Learn about auto modes, shutter priority, aperture priority, iso etc.
• Understanding histograms and using them effectively.
• Understanding exposure is one of the KEYS to successful shooting, and you will master exposure during this course!
• Also learn about depth of field, different lenses and their uses.
Composition
Learn the fine points of effective composition through twenty live examples
• Finding effective composition
• using lenses effectively
• seeking the best perspective; texture, color, point of view
• knowing zones of sharpness; selective focus; and the rule of thirds
• This will also make you think like an artist. From trying to take pictures, learn to make photographs. Learn some of the fine points from painters and others, who use visual elements to compose beautiful imagery.
Processing your
photographs
• Raw, JPEG and TIFF
• Free photo editing software and its use e.g. Picasa
• Introduction to Photoshop Elements software
• Learn color management, post-processing methods to improve the brightness, contrast, and white balance of your image.
• Resizing images for the web and for printing
Question and Answer Session
• You can put forth all your questions which have not been covered earlier in the workshop!
For information on Sujoy Das please do visit
www.sujoydas.com
www.sujoyrdas.blogspot.com
For photographs from past workshops please do visit
http://sujoyrdas.blogspot.com/2011/03/photography-workshops-kriya-studio_23.html
http://sujoyrdas.blogspot.com/2010/11/photography-workshops-creative-arts_15.html
ABOUT SUJOY DAS
Sujoy Das has been photographing, climbing and trekking in the Himalaya for the last thirty years. His photographs have been published in leading newspapers, magazines and books worldwide like The Washington Post, APA Publications,Frontline ,
India SIKKIM New Delhi
• Raw, JPEG and TIFF
• Free photo editing software and its use e.g. Picasa
• Introduction to Photoshop Elements software
• Learn color management, post-processing methods to improve the brightness, contrast, and white balance of your image.
• Resizing images for the web and for printing
Question and Answer Session
• You can put forth all your questions which have not been covered earlier in the workshop!
For information on Sujoy Das please do visit
www.sujoydas.com
www.sujoyrdas.blogspot.com
For photographs from past workshops please do visit
http://sujoyrdas.blogspot.com/2011/03/photography-workshops-kriya-studio_23.html
http://sujoyrdas.blogspot.com/2010/11/photography-workshops-creative-arts_15.html
ABOUT SUJOY DAS
Sujoy Das has been photographing, climbing and trekking in the Himalaya for the last thirty years. His photographs have been published in leading newspapers, magazines and books worldwide like The Washington Post, APA Publications,
Thursday, November 3, 2011
Spiti Images
This is my second instalment of Spiti images in black and white. For more photographs of Spiti please do visit my web site www.sujoydas.com/spiti.
 |
| Komic village |
 |
| High pass between Langza and Komic - peak of Chau Chau Kang Nilda |
 |
| Lhalung village |
 |
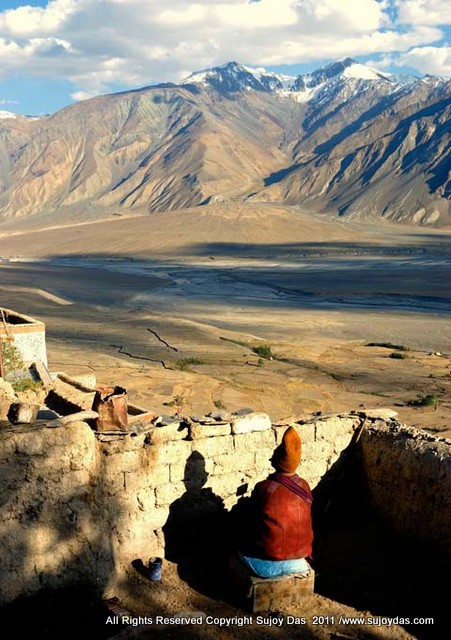
| Monk at Kye monastery |
 |
| Dhangkar - the new monstery complex |
Thursday, October 27, 2011
Spiti Photographs
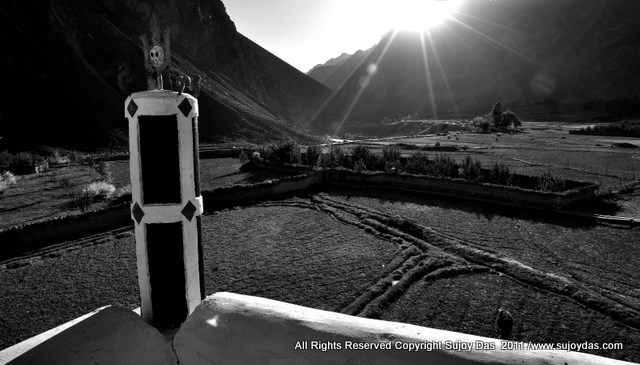
This is a small collection of black and white photographs from Spiti. For more photos please do visit my web site www.sujoydas.com/spiti.
 |
| Komic village |
 |
| Rooftop at Tabo |
 |
| Ki monastery |
 |
| From the Dhangkar monastery looking at the Spiti river |
 |
| Spiti valley below Ki monastery |
Subscribe to:
Posts (Atom)


